Tech & Toys
-
30th December Geocaching
So, on our last day in Wiltshire for 2012, I had the morning to myself and lovely blue skies. Off up to Bratton Camp (Broken link
https://maps.google.co.uk/?ll=51.26358,-2.147141&spn=0.015441,0.038581&t=h&z=15) I went, only to find the wind wasn’t really in the right direction and it was averaging 20mph at the lip of the hill, peaking to 28mph while I was there. Bit too windy for my Phoenix or the Weasel! So I figured I’d kill some time picking up a few Geocaches on my way back home. I map all of the Geocaches I find here, but below you can see the ones I picked up on Sunday.
-
2012 review
I thought I’d jot down some highlights of 2012 from the point of view of my hobby, mostly for my own benefit, so I can look back and at least have a record of what happen!
The year began with my first renewal at the Wanstead MFC, meaning I’d officially been affiliated with a club for a year. From a model point of view I was finishing the Mini Tyro which I had started in October 2011 but failed to finish in time for the birth of our daughter Nuala in November. For obvious reasons Christmas was busy, so the little Tyro had to wait until the New Year. Powered by a Indian Mills 75 and with mini RC gear I was very pleased with the result. The downside was I didn’t get round to maidening it until well into April!
Whilst not managing to fly the Tyro, I was certainly getting plenty of air time with the Wot 4, actually managing to pass my A test around February. Throughout the Spring I took advantage of my new freedom of being able to fly whenever I wanted and spent hours with the Wotty.During the spring I was building the P51 Mustang, which my wife bought me as a Christmas present in 2011. With the new baby it didnt progress very quickly, but hey ho, a hobby is for enjoying, not worrying about! I spent quite a bit of time finishing it with a paint job and some decals, trying to make it look like a proper P51. She stalled into the ground on the first flight, only damaging the prop thankfully but teaching me to keep the speed up on future flights!
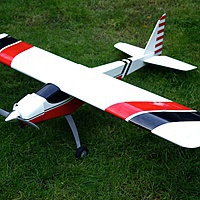
It was around the middle of Summer I started to think of something to replace the Wot 4 with, eventually picking the new Ripmax ARTF Acro Wot - another Chris Foss design. Originally I’d planned to put a SC70 Fourstroke in it, but eventually I found a OS FS81a on the BMFA Classifieds for a price I couldn’t refuse. It was out of the box and on the field within a month and was everything I hoped it would be. It wasn’t long before the Wot 4 would find itself on eBay, sadly I dont have the space to store it, a shame because it is still a great aircraft.
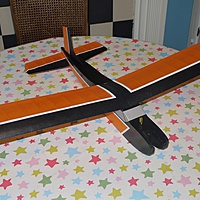
Somewhere in middle of the year I knocked up a S-Pou and a Liddlerod for use in the hall at our monthly meets, both were nice kits, enjoyable builds and fun to fly. Amazingly, and I’m still not quite sure why, I got the Sharkface bug. I printed the plan and figured I could knock one up for nothing using only scrap. This I did, in less than a week! I enjoyed it for a while, but eventually figured I needed the space more and sold it to somebody for a bargain £15 on eBay.It was around the summer I decided I was bored of the Blade 120SR and the Blade MSR and I sold those too, promising myself I’d get out with the 450 3D more often, which I’m pleased to say I have done. Regularly getting out and putting all four batteries through it.
Sometime around the late Summer, we visited the mother in laws new house in Wiltshire, and I discovered an amazing hill only a 5 min drive from her house. Hmm, a nice big glider stored in her garage might be in order. So within a few hours I’d convinced myself and had a Phoenix 2000 on order! I now keep the Weasel down there too.
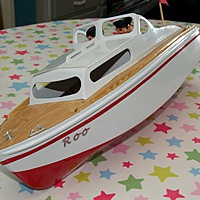
In Autumn I took a bit of a different tack when out of nowhere I decided to build my son a RC boat, I love working with wood so it had to be a wooden kit rather than some fiberglass thing. Soon I hit upon the Aerokits range, now reproduced and laser cut by Vintage Model Boat company. In about a month I managed to knock up a Sea Nymph which he now loves taking out onto the local pondAlso around this time I had a nice comment from a reader of the blog on my Wagtail page. In short he asked if he could buy it because he wanted to fly it. I’d never flown it so thinking it was better off with somebody who would actually use it, I said yes and a deal was done.
Somewhere along the way I sold the HPI Savage 4x4, which was too big and too noisy and too much hassle for me. I bought Edward a Lossi Micro Truggy which he loves. I never finished the paint on the Sand Scorcher, although I did sand, fill, sand and primer the body so it is a little closer.To finish the year I started another vintage model, this time the Diamond Demon which didnt get finished in 2012, but it will be soon.
I treated myself to the lovely flybarless collective pitch Blade 130X just before Christmas, and the final model of the year was a Stinger 64 EDF from Hobby King, which was my Christmas present from my wife this year.
Phew! now I’ve written it all down it feels like a hell of a lot of changes and new stuff in one year. We are planning on moving home in 2013, so I expect things will be a little more static!
-
Yearly blog report
I run this blog on the excellent WordPress platform, hosted on a virtual server with the great guys at Gandi. I do all the admin myself, which requires minimal effort, beyond the initial setup. This year, thanks to the stats WordPress collect from this site, they have produced a report of all the traffic in 2012. You can see that here, as you will notice the blog gets very little traffic, but it is still interesting to see where people are coming from and what they are searching for to find me!
-
Blade 130X
[]({{ “/uploads/2012/12/BLH3780_a2.jpg” | prepend: site.baseurl }})So a trip to 308 Hobbies to buy a couple of snakes (Broken link
http://www.sullivanproducts.com/GoldnRodMainFrame.htm) lead me to discover they had the 130X on sale at an unbelievable price. Ooops. So in short, I came home with two snakes for the Tuc, oh and a new heli. Ahem.
-
Broken Hotshot
[]({{ “/uploads/2012/12/IMG_7422-e1356105097440.jpg” | prepend: site.baseurl }})The lad has been having a bit of fun with his Losi Micro Truggy, slowly he is getting used to the throttle not being a binary thing and is learning he can pull it gently and the car goes slower. I figured maybe we could have some out doors with my Hotshot. So off we went to a local park (Broken link ~~https://maps.google.co.uk/maps?q=Alexandra+Park+Road,+London&hl=en&ll=51.592749,-0.135119&spn=0.007665,0.01929&sll=51.528642,-0.101599&sspn=0.491254,1.234589&oq=alexan&t=h&hnear=Alexandra+Park+Rd,+London,+United+Kingdom&z=16~~), much fun was had for half an hour or so, putting a couple of batteries through it. Until I noticed it was looking a bit saggy at the front, I’m used to the front suspension being a bit pathetic but something was clearly a miss.
Upon inspection I noticed a couple of things, firstly the car was now 3 wheel driving, the front right drive shaft was missing and secondly, where the lower right suspension arm mounts onto the front gearbox was all very loose. I had noticed it take a couple of quite high speed knocks to the front, but this was a bit of a surprise. A bit of a closer look showed that the right half of the front gearbox had a nice big crack in it, as you can see from the picture over on the right! Click for a bigger one, this is the taken from underneath, you can see how big the crack is.
I am now wondering about the choice of that upgraded Sport GT (Broken link
http://www.tamiyausa.com/product/item.php?product-id=53779) motor I bunged into the chassis in a moment of weakness last year, maybe the stock 540 would have been enough for #1 son 🙂 I’ve now ordered up a pair of replacement front drive shafts and the ‘G’ Parts (Broken linkhttp://www.tamiyausa.com/product/item.php?product-id=9115191) sprue which contains both halves of the front and rear gearboxes, from Fusion Hobbies. Hopefully if it happens again it is the left side that takes a knock, not the right!
-
Lego Mini Hogwarts Express (40028)
We bought this set a while ago. I don’t like keeping piles of paper manuals around the place and normally manage to find a PDF copy online somewhere. With this one though I’ve had no luck, I did find some evidence that it was hosted on lego.com but it is now returning a 404. So I figured I’d scan mine, you can download that here. I’ve included the brickset.com entry for this set below.
-
Lego Series 8 Minifigs dot codes - updated
Only one so far, the Diver, number 6.
-
Evil Robot with a laser gun.
-
Conquistador with a rapier.
-
Lederhosen Guy with a pretzel.
-
Cowgirl with a brown lasso.
-
American Football Player with gold trophy.
-
Diver with a harpoon.
[]({{ “/uploads/2012/09/Series8-6.jpg” | prepend: site.baseurl }})
-
Downhill Skier with skis.
-
Businessman with newspaper and suitcase.
-
Fairy with wings and a wand.
-
Santa with sack.
-
Vampire Bat with bat wings.
-
DJ with a disc and a disc case.
-
Red Cheerleader with red pom poms.
-
Actor with a skull.
[]({{ “/uploads/2012/09/Series8-14.jpeg” | prepend: site.baseurl }})
-
Pirate Captain with gold cutlass and hook.
-
Alien Villainess with a laser gun.
-
-
ADSL Speed test
My home ADSL speed N22, London. BeBroadband.
-
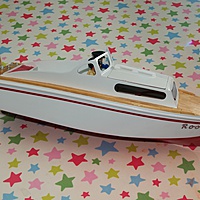
Aerokit Sea Nymph finished
Well she took to the water in her final form today, all seems well. A little teething trouble, I want to remove some of the grease in the prop shaft and replace it with a light oil, I think it is causing the motor to have to work harder because there is too much in there. Apart from that its all good. I’ll look to knock up a stand at some point, but other than that the little man now keeps asking me to take him to the pond!
You can read through all the posts about the Sea Nymph build here.
-
Aerokit Sea Nymph build – part 11
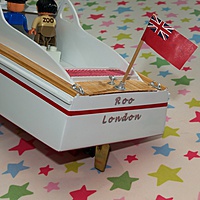
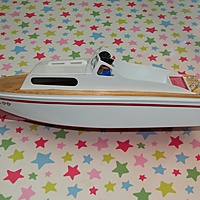
She is finished! We have yet to take her onto the water since the ’naked’ outing a few weeks back, but hopefully we’ll get a chance this weekend.
I painted her with Halfords Acrylic paints, masked up with Tamiya tape. Once everything had a few days to dry I polished up the paint and the deck with polishing compounds, coarse first and then fine.
I bought a few simple deck fittings from the Vintage Model boat company to set the deck off, these needed tidying up quite a bit with coarse sandpaper, after which I sprayed them with Tamiya primer followed by a couple of coats of silver metalic.
The decals I made using an inkjet and some clear water slide decal paper. They were given a coat of gloss acrylic and then given another coat to seal the edges once in position. The name is what he calls himself, which is nothing like his name but hey ho, who knows what a 2.75 year old is thinking ;-)
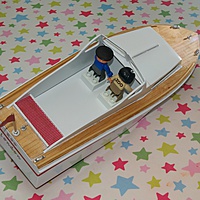
As for the people well, as I said the boat is really for my toddler and apart from Thomas the Tank Engine, Lego is his next favourite thing. And there was no way I was going to have a steam train driving the thing! I glued two 2x2 duplo blocks to the rear deck so he can chop and change the figures as he wants. I now wonder if I should have just used a entire plate of duplo for the rear deck, oh well he hasn’t complained!
Right, that’s that I think. I might post some action shots if I get a chance to take my camera when we go to the pond.
You can read through all the posts about the Sea Nymph build here.
