Tech & Toys
-
Zoomster Trailer
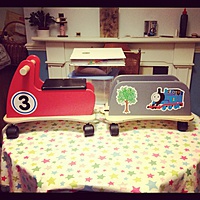
Sometime earlier last year we were given a Zoomster Racer (Broken link ~~http://www.inspirationalgroup.co.uk/inspirational-nurseries/active-play/ride-ons-/zoomster-racer/~~), like the one you see in the picture on the left. Our toddler absolutely adores it and scoots all round the house with it. There is a little box under the seat to put toys in which is obviously always full! One day my wife suggested making him a little trailer for it so he could carry more toys around with him. The company who make it don’t seem to make a trailer, but it does have a convenient hole cut in the base board at the back, which would make it easy to attach a trailer. Hmm, this sounds like a plan then!
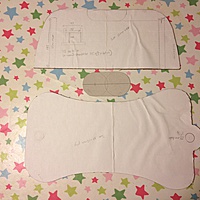
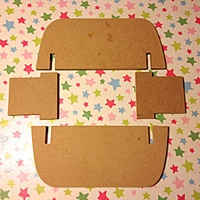
I pondered what shape to make it and how to construct it for a while and then settled on the following. I took it apart - thankfully it was all screwed together - and traced the bottom and one of the side panels onto some card to use as templates. I clearly didn’t need the bits sticking up for the handles, therefore I just mirrored the side panel about its middle, so the front and the back were identical, and the same as the curve on the front of the Zoomster itself. Then I would simply get the base and the sides cut out and sort out some end bits. You can see the card templates over on the right. Next I took them to the friendly guys in my local wood merchant, Thomerson in Crouch End. Between us we selected a nice bit of 1" thick ply for the base and some 10mm MDF for the top structure. The guy in the shop had the idea of cutting notches in the sides and the end bits so they sort of slot together, which made things strong, and because he cut these out on his saw, much easier for me!
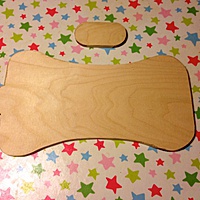
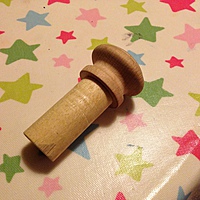
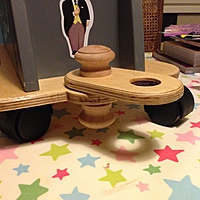
The two pics above show the component parts of the top and the base. The small bit above the base in the lower picture is what I’d come up with as a connector. I planned to cut two holes in this, one at each end, then using some 1" diameter dowel and some wooden cupboard door handles fashion a couple of connectors. A picture will explain it easier than I can explain it! The first pic is of the removable connector to allow him to detach the trailer from the Zoomster, as you can see I just glued the handle onto a short length of dowel. In the second pic you can see I did the same for the trailer end, but trapped the connector in place by glueing another handle on the bottom. Sorted!
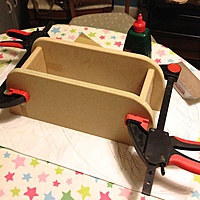
Returning home I started off by gluing the four bits of the top, clamping them to ensure a good bond.
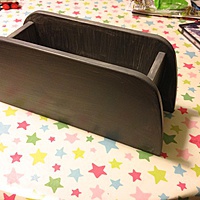
I gave this all a couple of coats of undercoat, and a couple of a nice shiny grey topcoat which I had lying around (ok, ok, it was left over from painting the front door!).
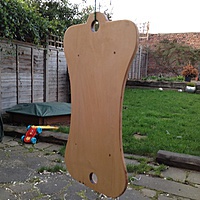
Last bit of prep was to give the base a few coats of varnish, to save me the time of waiting for one side to dry and then doing the other, I simply hung it from a nearby washing line and did it all at once. I ended up giving it four coats to ensure a good tough finish.
With the addition of some carstors from eBay, and a few screws to hold the top to the base I was finished. We even found some Thomas stickers on eBay to jazz it up a bit.
And that was it done, it was filled to the brim with Thomas trains almost immediately and has remained that way and attached to the Zoomster ever since!
-
Old and new London Heathrow maps
I recently found an old map of the Heathrow area on Wikipedia. It shows the area as it was in the 1930’s, when the aiport was known as the Great West Aerodrome. You can drag the slider to fade in the current map, which I nabbed from Open Street map. Producing that was the very limit of my CSS/JS knowledge, so sadly you can’t pan around it like you can with normal online maps!
You can see the maps here.
-
Flight log
[]({{ “/uploads/2013/01/Screen-Shot-2013-01-14-at-12.54.43.png” | prepend: site.baseurl }})
I’m going to experiment with writing flight logs. This will probably evolve over time as I think of things I’d like to capture.
Today I went out with the Blade 450, put four batteries through it in the snow (!). Despite being 1-2C outside the batteries performed well, giving 6 mins each and when returning home and checking they were all showing 35-40% left in them.
Mostly I was practising hovering, moving to side on hovering. I’ve wound the expo up to 40% on Aileron and Elevator, seems to help me with keeping it stable. Doing circuits I find it seems to get away with me as I turn it around to come back long the edge of the circuit, gaining speed which I have difficulty bleeding off. Good session though!
Cell balance was as follows:
<th>
  V Max-Min
</th>
<td> 0.03 </td><td> 0.02 </td><td> 0.09 </td><td> 0.011 </td>Trying out the parallel charge lead for the first time, I find one of the connectors is duff, most likely my soldering at the join. A shame I didn’t know this before I wrapped it all in heat shrink!
-
The Wood Life
Back in September we spent a lovely week Glamping down in Devon at the wonderful Wood Life. They have 8 acres of woodland in the middle of a big field near the village of Kenn (Broken link ~~https://maps.google.co.uk/?ll=50.657297,-3.526182&spn=0.017711,0.045447&t=h&z=15~~). The main feature of the camp is the big (10 x 5 meter) Albion Canvas (Broken link
http://www.albioncanvas.co.uk/) safari tent, which has a nice wood burner and a couple of bedrooms with proper beds! There is a gas hob and a sink with running water, which takes some of the pain of camping away, as well as a big dinning table and a sofa in a lounge area. Outside there is a toilet and shower hut, the shower being gravity fed from a tank up in the trees and heated by a small wood burning boiler. In the middle there is a nice camp fire with logs for seating and for the kids there is a tree house, see-saw and a massive swing, hung from one of the trees. We had a great time down there, but having to light a fire in the mornings to warm the place up was a bit of a shell shock when you come from a nice house with central heating!Below is a panorama I took of the camp which you should be able to move about with your mouse, you can see all the bits of the camp from there.
-
EPC - Energy Performance Certificates
So in the UK to sell a house you need a EPC, this is a little certificate that takes some bloke 10 mins to produce, im not kidding the guy was in and out of my house in less than that. The charge seems to be anywhere from £40 right up to £100! The only bit that ends up on the property details is this bit:
[]({{ “/uploads/2013/01/20130109-231449.jpg” | prepend: site.baseurl }})
Which I doubt anybody looks at, I’m certainly not going to pass up the house of my dreams because some dude in 10 minutes considered it to be a G. And I can probably guess that single glazing and gaps around the external doors aren’t the best at keeping the warmth in.
The full version that nobody ever sees contains some useful info like that shown below. Seriously who needs this shit.
[]({{ “/uploads/2013/01/20130109-231051.jpg” | prepend: site.baseurl }})
So using the bottom estimates and assuming the savings are correct that is 38.7 years and I’m in profit, or using the top estimates that is 75.9 years and I’m quids in.
YEAH MAN, I WANT SOME OF THAT SHIT
I’ll write a cheque for 40k - Come 2088 I’ll be fucking laughing, oh yeah.
-
Yeo Valley walk
[]({{ “/uploads/2013/01/8033050444_c7cf5eb26a_o.jpg” | prepend: site.baseurl }})Back in September, Jenny won a free trip around the Yeo Valley farm. They produce a wide range of organic dairy products, including butter, milk and a range of tasty yoghurt’s and they were inviting people to come and have a look around. We didn’t really know what to expect to be honest, but were pleasantly surprised by what we found. They have recently converted an old hotel in Blagdon down in Somerset, into a lovely office and visitor centre (Broken link ~~https://maps.google.co.uk/maps?q=yeo+valley+visitor+centre&hl=en&ll=51.324373,-2.721809&spn=0.002273,0.005681&oe=utf-8&client=firefox-a&safe=images&hq=yeo+valley+visitor+centre&hnear=London,+United+Kingdom&t=h&z=18~~), this is where we met up. Then we were taken by bus up the lanes to one of their farms, where they took us on a guided tour around some of the fields, explaining the organic process and how they look after the cattle. We ended the day with a look around one of the milk facilities. Below is a track of the walk around the farm.
-
30th December Geocaching
So, on our last day in Wiltshire for 2012, I had the morning to myself and lovely blue skies. Off up to Bratton Camp (Broken link
https://maps.google.co.uk/?ll=51.26358,-2.147141&spn=0.015441,0.038581&t=h&z=15) I went, only to find the wind wasn’t really in the right direction and it was averaging 20mph at the lip of the hill, peaking to 28mph while I was there. Bit too windy for my Phoenix or the Weasel! So I figured I’d kill some time picking up a few Geocaches on my way back home. I map all of the Geocaches I find here, but below you can see the ones I picked up on Sunday.
-
2012 review
I thought I’d jot down some highlights of 2012 from the point of view of my hobby, mostly for my own benefit, so I can look back and at least have a record of what happen!
The year began with my first renewal at the Wanstead MFC, meaning I’d officially been affiliated with a club for a year. From a model point of view I was finishing the Mini Tyro which I had started in October 2011 but failed to finish in time for the birth of our daughter Nuala in November. For obvious reasons Christmas was busy, so the little Tyro had to wait until the New Year. Powered by a Indian Mills 75 and with mini RC gear I was very pleased with the result. The downside was I didn’t get round to maidening it until well into April!
Whilst not managing to fly the Tyro, I was certainly getting plenty of air time with the Wot 4, actually managing to pass my A test around February. Throughout the Spring I took advantage of my new freedom of being able to fly whenever I wanted and spent hours with the Wotty.During the spring I was building the P51 Mustang, which my wife bought me as a Christmas present in 2011. With the new baby it didnt progress very quickly, but hey ho, a hobby is for enjoying, not worrying about! I spent quite a bit of time finishing it with a paint job and some decals, trying to make it look like a proper P51. She stalled into the ground on the first flight, only damaging the prop thankfully but teaching me to keep the speed up on future flights!
It was around the middle of Summer I started to think of something to replace the Wot 4 with, eventually picking the new Ripmax ARTF Acro Wot - another Chris Foss design. Originally I’d planned to put a SC70 Fourstroke in it, but eventually I found a OS FS81a on the BMFA Classifieds for a price I couldn’t refuse. It was out of the box and on the field within a month and was everything I hoped it would be. It wasn’t long before the Wot 4 would find itself on eBay, sadly I dont have the space to store it, a shame because it is still a great aircraft.
Somewhere in middle of the year I knocked up a S-Pou and a Liddlerod for use in the hall at our monthly meets, both were nice kits, enjoyable builds and fun to fly. Amazingly, and I’m still not quite sure why, I got the Sharkface bug. I printed the plan and figured I could knock one up for nothing using only scrap. This I did, in less than a week! I enjoyed it for a while, but eventually figured I needed the space more and sold it to somebody for a bargain £15 on eBay.It was around the summer I decided I was bored of the Blade 120SR and the Blade MSR and I sold those too, promising myself I’d get out with the 450 3D more often, which I’m pleased to say I have done. Regularly getting out and putting all four batteries through it.
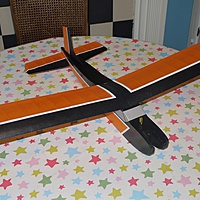
Sometime around the late Summer, we visited the mother in laws new house in Wiltshire, and I discovered an amazing hill only a 5 min drive from her house. Hmm, a nice big glider stored in her garage might be in order. So within a few hours I’d convinced myself and had a Phoenix 2000 on order! I now keep the Weasel down there too.
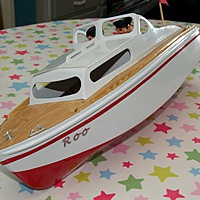
In Autumn I took a bit of a different tack when out of nowhere I decided to build my son a RC boat, I love working with wood so it had to be a wooden kit rather than some fiberglass thing. Soon I hit upon the Aerokits range, now reproduced and laser cut by Vintage Model Boat company. In about a month I managed to knock up a Sea Nymph which he now loves taking out onto the local pondAlso around this time I had a nice comment from a reader of the blog on my Wagtail page. In short he asked if he could buy it because he wanted to fly it. I’d never flown it so thinking it was better off with somebody who would actually use it, I said yes and a deal was done.
Somewhere along the way I sold the HPI Savage 4x4, which was too big and too noisy and too much hassle for me. I bought Edward a Lossi Micro Truggy which he loves. I never finished the paint on the Sand Scorcher, although I did sand, fill, sand and primer the body so it is a little closer.To finish the year I started another vintage model, this time the Diamond Demon which didnt get finished in 2012, but it will be soon.
I treated myself to the lovely flybarless collective pitch Blade 130X just before Christmas, and the final model of the year was a Stinger 64 EDF from Hobby King, which was my Christmas present from my wife this year.
Phew! now I’ve written it all down it feels like a hell of a lot of changes and new stuff in one year. We are planning on moving home in 2013, so I expect things will be a little more static!
-
Yearly blog report
I run this blog on the excellent WordPress platform, hosted on a virtual server with the great guys at Gandi. I do all the admin myself, which requires minimal effort, beyond the initial setup. This year, thanks to the stats WordPress collect from this site, they have produced a report of all the traffic in 2012. You can see that here, as you will notice the blog gets very little traffic, but it is still interesting to see where people are coming from and what they are searching for to find me!
-
Phoenix 2000 - update
I have managed a few updates since September when I added the page for the Phoenix. First off was fitting the flap servos in the wings, next I added a 5A sBEC because the BEC in the supplied ESC is said to not be up to the challenge of powering 6 servos. All was then well and I had a couple of flights over the weekend. The flaps seemed to work ok, more fiddling with regard to the amount of deflection is needed, and I’d like to try crow braking and full strip ailerons. Another day though!
Two things did occur to me though, firstly that plugging 4 servos into the receiver while rigging for each flight was somewhat tedious. And secondly on the last flight of that weekend (Sometime in November) an alarming amount of dihedral had developed in the wing, clearly something was amiss! I got her down again thankfully and started to investigate the cause of the flappy wings. At the time I discovered one of the ply plates in the wings had de-laminated completely, I could pull each of the layers of wood away from the next, this is not good! When I got back to London I cut two new 3/32" ply plates for the wings and a new ply joiner.
Over Christmas we were down in Wiltshire again so I got to glue in my new wing joiner plates. While waiting for the glue to dry I assembled the Weasel which I also store down there. And lo and behold, at the bottom of the bag was the carbon wing joining spar which I’d forgotten to install in the Phoenix! I’d even forgotten such a thing existed, what an utter fool. Oh well, no harm done. I was lucky to get her back in one bit and at least there are decent ply plates in the wings.
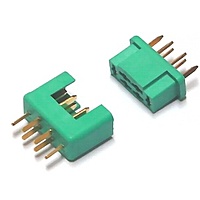
Next up was how to solve the problem of all those wires. I Googled a bit around the subject and found a lot of people using Multiplex connectors. These are 6 pin items, normally used as a battery connector, however because of the number of pins they make handy things for joining servo wires.
I’ve soldered both the servowires in one wing to a single male connector, and the same on the other wing panel, but using a female connector. Then all I had to do was take four servo extension leads, remove the sockets and solder them to a socket and a plug. Having one wing as female and one as male ensures I don’t get them mixed up when plugging everything in. 24 soldered connections, all wrapped in heatshrink tubing took a while but I think it was worth it. They make for very positive connections and feel a lot more robust than repeatedly plugging wires into a receiver.
Thats all for now, I’m not sure when our next trip down to the West country will be, but I’m looking forward to it.

