Tech & Toys
-
Fishtank Temperature monitor
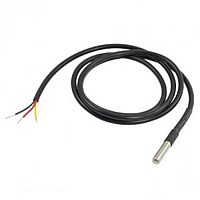
So while having an enforced break from work I figured maybe it would be fun to hook my Pi Zero up to a waterproof temperature sensor and drop the sensor into my aquarium.
A spot of research suggested this was a common use for a Pi, with almost everybody using the 1 Wire DS18B20 sensor. A bit of googling later found this sensor on eBay, waterproof and with a nice long cable. Sorted.
A very useful blog post is here, much more detail is provided there, I used the sample python code almost verbatim for the reading of the temp, only adding a few config options and the ability to post to a MQTT broker.
I’ve pushed two versions of my code to GitHub here, one which publishes to an MQTT broker and the almost unchanged version of the code from the blog post linked above, which simply prints the temp (only in C in my version) to STDOUT. The only modification I made was to enable the specification of the 1-Wire sensor device name via the ‘W1_DEVICE’ environment variable. If you don’t provide that the code tries to figure it out, but then will only support a single sensor (I think!). If you have multiple sensors then just put the name of the device in the ‘W1_DEVICE’ variable.
Other things of note.
I had to fiddle with the config.txt settings, they seem dependant on kernel version. For reference, on my Pi Zero I’m running this version:
Linux zero 4.1.13+ #826 PREEMPT Fri Nov 13 20:13:22 GMT 2015 armv6l GNU/LinuxMy working config.txt settings:
dtoverlay=w1-gpio,gpiopin=4,pullup=onI also created the file “/etc/modules-load.d/one-wire.conf" containing just these two lines:
w1-gpio
w1_therm
This forces the module loader to load the 1 Wire GPIO module and the 1 Wire Thermometer sensor.
If you have troubles with my python code, the following bash, pasted into a terminal should work ok.
Finally
Now I had the temperature being published to my MQTT broker (Mosquitto), it was a simple matter to pull that off the bus using the Paho JavaScript MQTT client, and render out a little gauge using the excellent Highcharts JS charting library. A snapshot of the gauge can be seen up at the top of this blog post, info.riviera.org.uk - which is where I keep a bunch of my ‘data’ collection things.
-
Scripting the Sonatype Nexus Pro instalation
The installer for NexusPro uses Install4J. Although the Nexus documentation doesn’t explain how, you can script the installer by providing a
response.varfile. I found this to be quite picky about order and arguments, the ones shown below are known to work in this specific order.% bash ./nexus-pro-trial-installer-latest-unix.sh -varfile response.varfile -q -dir /home/builder/nexus -overwrite -splashBoom! It installs without question. It should be available at
http://localhost:8081/nexus/index.htmlExample response file
#install4j response file for Sonatype Nexus Pro Trial 2.11.4-01
#Mon Nov 02 12:38:09 UTC 2015
nexus.evalGuideDir=/home/root/nexus-evalguide
sys.adminRights$Boolean=false
nexus.launchControl$Boolean=true
nexus.startService$Boolean=true
sys.programGroupDisabled$Boolean=false
sys.component.pro$Boolean=true
nexus.createDesktopLinks$Boolean=true
nexus.tmpDir=/root/.nexus-pro-trial/tmp
nexus.workDir=/root/.nexus-pro-trial
nexus.httpPort$Long=8081
sys.languageId=en
sys.installationDir=/root/nexus-pro-trial-2.11.4-01
nexus.openEvalGuide$Boolean=false
nexus.openAppUrl$Boolean=false
sys.symlinkDir=/usr/local/bin
sys.component.trial-config$Boolean=true
sys.component.trial-evalguide$Boolean=true
Good luck!
-
Fortigate Firewall Logstash Grok filter
I’ve been playing with Logstash recently, just this week I was asked to import a Fortigate firewall log. I did this by putting up a logstash syslog interface on a specific port, tagging the inbound traffic as type=fortigate and then using a simple RE and the kv{} filter to parse the log.
The gist can be seen here, or embedded below:
-
Monitoring beanstalkd with monit
A new project I’ve just deployed onto live uses the fast and lightweight beanstalkd work queue. As part of putting it into live I wanted to get at least some basic monitoring on the beanstalkd daemon. All my servers run monit for keeping an eye on processes I care about, so that seemed a good place to start.
I had a bit of a look around the interwebs but couldn’t find any examples, so I set about putting something together myself. As it turns out beanstalkd has a nice simple text protocol, detailed in protocol.txt which is included in the source, and monit has the ability to send and expect arbitrary strings to a given port. For starters I’ve set it up to issue a stats command and check for the expected response which is:
-
Missing BNX2 firmware for Debian PXE/Netboot installations
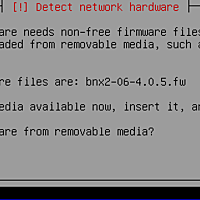
I seem to have a inherent disklike of Debian and the feeling appears to be mutual. It never makes my life easy. Just this morning I needed to install it on a Dell R210 rather than our usual Centos builds. The server is 15 odd miles away, so I took my standard route of PXE installing. After downloading the netboot.tar.gz and dropping the right files in place on my netboot server, I booted the R210 and began the install. Only a couple of screens in I was presented with this most unhelpful message. So I have to drive 30 miles to plug a usb stick into this machine to continue? That isn’t acceptable imho.
In my case it was the non free firmware for the Broadcom ethernet cards in the machine, I needed this package.
Turns out there is a fix. You just need to download the missing .deb, cpio it and cat it into the end of the initrd:
% mkdir /tmp/firmware
% cd /tmp/firmware
% wget http://ftp.uk.debian.org/debian/pool/non-free/f/firmware-nonfree/firmware-bnx2_0.28+squeeze1_all.deb</a>
% cd /tmp
% find firmware | cpio -o | gzip -c > firmware.cpio.gz
Now cat the resultant firmware.cpio.gz onto the end of the existing initrd.gz, which for me was in /tftpboot/debian-installer/amd64/initrd.gz. So I ran this:
% cat /tmp/firmware.cpio.gz >> /tfpboot/debian-installer/amd64/initrd.gzThat will overwrite the initrd.gz without warning, so might want to take a backup of it first.
-
Apple Aperture 3.4 update
So on the day of iOS6 Apple also released the 3.4 update to Aperture and osX 10.8.2. It seems if you apply all these updates, Aperture first updates your library, and then quits every time you load it. Brilliant, gee thanks Apple. why bother with actually testing software, you wouldn’t want to dent the 100 billion you have in the bank. Anyway, apparently it is something to do with the Facebook account info held within Aperture, you can zero this out by runnning the following at the command line:
% defaults remove com.apple.Aperture AccountConfigurationsThis worked for me but Aperture no longer knew about my Flickr, or Facebook accounts. At least I got my photos back. Between this and iOS6 maps, this isn’t a great week to own Apple products.
-
Local RPMs update
This is an update to the earlier post where I linked to some RPMs which I maintain for my own purposes. If you find these useful, please feel free to download them.
In the filenames, el6 is Red Hat Enterprise Linux 6 (Centos), el5 is Red Hat Enterprise Linux 5 (Centos), fc7 is Fedora Core 7.
If a link is broken, feel free to have a click around the SVN repository, the root of where I keep all the RPM stuff is here. Or please email me.
colortail
- colortail-0.3.3-1.el5.i386.rpm
- colortail-0.3.3-1.el5.x86_64.rpm
- colortail-0.3.3-1.el6.x86_64.rpm
- colortail-0.3.3-1.el5.src.rpm
-
colortail-0.3.3-1.el6.src.rpm daemontools
- daemontools-0.76-1.el5.i386.rpm
- daemontools-0.76-1.fc7.i386.rpm
- daemontools-debuginfo-0.76-1.fc7.i386.rpm
- daemontools-0.76-2.el5.i386.rpm
- daemontools-0.76-2.el6.x86_64.rpm
- daemontools-0.76-1.el5.x86_64.rpm
- daemontools-0.76-2.el5.x86_64.rpm
- daemontools-0.76-2.el6.src.rpm
- daemontools-0.76-1.el5.src.rpm
-
daemontools-0.76-2.el5.src.rpm djbdns
- djbdns-debuginfo-1.05-1.fc7.i386.rpm
- djbdns-1.05-1.el5.i386.rpm
- djbdns-1.05-1.fc7.i386.rpm
- djbdns-1.05-1.el5.x86_64.rpm
- djbdns-1.05-1.el6.x86_64.rpm
- djbdns-1.05-2.el6.x86_64.rpm
- djbdns-1.05-2.el6.src.rpm
- djbdns-1.05-1.el5.src.rpm
-
djbdns-1.05-1.el6.src.rpm haproxy
- haproxy-1.4.10-1.el5.i386.rpm
- haproxy-1.4.10-1.el6.x86_64.rpm
- haproxy-1.4.10-1.el5.x86_64.rpm
- haproxy-1.4.10-1.el6.src.rpm
-
haproxy-1.4.10-1.el5.src.rpm isync
- isync-1.0.4-2.el5.i386.rpm
- isync-1.0.4-2.el5.x86_64.rpm
- isync-1.0.4-1.x86_64.rpm
- isync-1.0.4-2.el6.src.rpm
-
isync-1.0.4-2.el5.src.rpm keepalived
- keepalived-1.1.19-5.el5.i386.rpm
- keepalived-1.2.1-5.el5.i386.rpm
- keepalived-1.1.19-5.el5.x86_64.rpm
- keepalived-1.2.1-5.el5.x86_64.rpm
- keepalived-1.2.1-5.el5.src.rpm
-
keepalived-1.2.1-5.el6.src.rpm netatalk
- netatalk-2.0.5-2.el5.i386.rpm
-
- keepalived-1.2.1-5.el5.src.rpm
- keepalived-1.2.1-5.el5.x86_64.rpm
- keepalived-1.1.19-5.el5.x86_64.rpm
- keepalived-1.2.1-5.el5.i386.rpm
- keepalived-1.1.19-5.el5.i386.rpm
-
- isync-1.0.4-2.el6.src.rpm
- isync-1.0.4-1.x86_64.rpm
- isync-1.0.4-2.el5.x86_64.rpm
- isync-1.0.4-2.el5.i386.rpm
-
- haproxy-1.4.10-1.el6.src.rpm
- haproxy-1.4.10-1.el5.x86_64.rpm
- haproxy-1.4.10-1.el6.x86_64.rpm
- haproxy-1.4.10-1.el5.i386.rpm
-
- djbdns-1.05-1.el5.src.rpm
- djbdns-1.05-2.el6.src.rpm
- djbdns-1.05-2.el6.x86_64.rpm
- djbdns-1.05-1.el6.x86_64.rpm
- djbdns-1.05-1.el5.x86_64.rpm
- djbdns-1.05-1.fc7.i386.rpm
- djbdns-1.05-1.el5.i386.rpm
- djbdns-debuginfo-1.05-1.fc7.i386.rpm
-
- daemontools-0.76-1.el5.src.rpm
- daemontools-0.76-2.el6.src.rpm
- daemontools-0.76-2.el5.x86_64.rpm
- daemontools-0.76-1.el5.x86_64.rpm
- daemontools-0.76-2.el6.x86_64.rpm
- daemontools-0.76-2.el5.i386.rpm
- daemontools-debuginfo-0.76-1.fc7.i386.rpm
- daemontools-0.76-1.fc7.i386.rpm
- daemontools-0.76-1.el5.i386.rpm
-
- colortail-0.3.3-1.el5.src.rpm
- colortail-0.3.3-1.el6.x86_64.rpm
- colortail-0.3.3-1.el5.x86_64.rpm
- colortail-0.3.3-1.el5.i386.rpm
-
SVN to (BitBucket) Git migration
Notes from the migration of my personal SVN repo to Git and also onto the hosted Git platform Bitbucket.org.
First step was to tell my local git install who I was:
$ git config --global user.name "Robin Kearney"
$ git config --global user.email "robin@kearney.co.uk"
I always set the following too:
$ git config --global color.diff auto
$ git config --global color.status auto
$ git config --global color.branch auto
Then to import a section of my SVN repo:
$ git svn clone --authors-file=path/to/authors_file SVN_REPO_URL LOCAL_DIR
$ cd LOCAL_DIR
$ git svn show-ignore > .gitignore
$ git remote add origin git@bitbucket.org:rk295/GIT_REPO.git
$ git push origin master
Some people advise using
-son the ‘git svn’ command, which tells git to expect trunk/ tags/ etc. But I dont use those in my repo, so I omitted it.SVN_REPO_URL is the full http://…. URL to the SVN repo to import, or in my case a sub-section of it.
The
--authors-filetells git the location of a text file which maps SVN users to Git users, mine looked like this:robin = Robin Kearney <robin@kearney.co.uk>
-
Using a non supported Timemachine volume
Always forget this bit:
defaults write com.apple.systempreferences TMShowUnsupportedNetworkVolumes 1Speficially needed if you are using a Linux box, shared by Apple Talk.
From here (Broken link
http://www.nextgengeek.com/2011/03/05/howto-use-linux-as-a-networked-timemachine-volume-for-your-mac/) in this instance, although there are loads of howtos.
-
AirPrint for iOS on Linux
I quite often used to find myself wanting to print from my iPad, so when Apple announced AirPrint I thought things were looking good. According to the press release you would need either a HP printer or you could print to a shared printer on an existing mac. Sorted, I’ve got the latter of those, things were looking rosy.
Things took a turn for the worse when I read that they had pulled support for printing via shared printers and were only going to allow AirPrint to certain (at the moment only HP) printers. I wanted the feature, but not enough to replace my trusty Lexmark (Broken link ~~http://www.lexmark.co.uk/lexmark/product/home/369/0,6970,252735_796629346_1190270321_en,00.html?tabId=1~~).
Luckily there are people like this guy on the internet who took the time to figure out how it works and have since published a nice simple guide about how to setup a Linux box as a AirPrint server. Mainly thanks to Cups and some Avahi magic.
Sorted! And I’ve used it sufficiently to think spending an hour or so setting it up was worth while.


