Tech & Toys
-
Scripting the Sonatype Nexus Pro instalation
The installer for NexusPro uses Install4J. Although the Nexus documentation doesn’t explain how, you can script the installer by providing a
response.varfile. I found this to be quite picky about order and arguments, the ones shown below are known to work in this specific order.% bash ./nexus-pro-trial-installer-latest-unix.sh -varfile response.varfile -q -dir /home/builder/nexus -overwrite -splashBoom! It installs without question. It should be available at
http://localhost:8081/nexus/index.htmlExample response file
#install4j response file for Sonatype Nexus Pro Trial 2.11.4-01
#Mon Nov 02 12:38:09 UTC 2015
nexus.evalGuideDir=/home/root/nexus-evalguide
sys.adminRights$Boolean=false
nexus.launchControl$Boolean=true
nexus.startService$Boolean=true
sys.programGroupDisabled$Boolean=false
sys.component.pro$Boolean=true
nexus.createDesktopLinks$Boolean=true
nexus.tmpDir=/root/.nexus-pro-trial/tmp
nexus.workDir=/root/.nexus-pro-trial
nexus.httpPort$Long=8081
sys.languageId=en
sys.installationDir=/root/nexus-pro-trial-2.11.4-01
nexus.openEvalGuide$Boolean=false
nexus.openAppUrl$Boolean=false
sys.symlinkDir=/usr/local/bin
sys.component.trial-config$Boolean=true
sys.component.trial-evalguide$Boolean=true
Good luck!
-
The lads Sparrowhawk build update
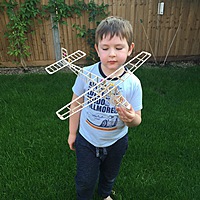
Thanks to the nicely engineered kit and the laser cutting progress was swift on the lads model. After assembling the wings, the tail features and fuselage came together quickly and we found ourselves with a completed airframe.
-
First build with the lad
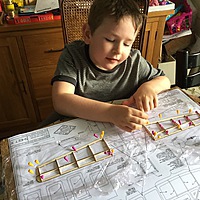
The lad has a few of my old rubber models hung in his room, currently sporting the Red Wing, Tomtit and Beaver as ceiling decoration. Recently he seems (like most kids his age I think) to be quite into Minions, and asked if we could paint the Red Wing blue and yellow. I explained that much paint wouldn’t really help fly well - we still occasionally fly it. But I asked if he would like to build a model with me, learning how it is built and covered and then we could cover it in blue and yellow tissue to match the damn Minions! He seemed really excited by this idea, so a plan was formed. I just needed a likely candidate. Quite by chance I was flicking through the pages of this months Aeromodeller when I saw a review of one of the Vintage Model Companys range of 8 Magnificent flying machines. This one in particular was the Sparrowhawk, so I ordered one and this week we started the build. Below you can see the little man with the almost completed wings. Much fun is being had, even if he is a little heavy handed with the glue! Nothing that a bit of careful wiping can’t solve though!
Gallery
-
Mossie in flight
It is rare that I get a shot of any of my models in flight, so when my father expressed an interest in seeing the Mosquitto in the air I suggested he brought along his camera. A couple of the shots are below, the rest on the Mossie page.
-
Northolt Open day 2015
Our local RAF base, Northolt holds an airshow once a year, this was the first year since living in the area that I manage to attend. The weather was pretty dire, meaning most of the headliners of the flying program couldn’t fly, the kids and I had worn ourselves out walking around the various static attractions and given the lack of flying we decided to leave. Our route back to the car took us up a public road which passes by the end of the runway. From here I could make out the DH Rapide starting its engines and generally looking like it was about to fly. So we sat patiently and waited, and lo! we finally saw some action. Our vantage point right at the end of the runway made for some great shots, a gallery of which can be seen below.
-
WLMAC Scale Day 2015
My club holds a friendly scale competition once a year. The gallery below shows a few shots I took while at this years event, I didn’t take part this year but was happy to stand around chatting and taking some pics. It was very nice to meet Richard Crapp and Mick Reeves, who both turned up with a couple of BMFA scale judges to talk about the competition side of the hobby. Overall a very enjoyable day.
-
Fournier problems
The rear turtle deck of the Fournier and I never really got on. It is supplied as a vac-formed component which is trimmed to fit and glued over the formers and stringers. Initially I used the same Titebond which I have used for the rest of the build, however when I visited the shed the morning after I heard a disturbing crack when I handled the fuselage. Further investigation revealed the glue simply hadn’t stuck to the plastic and the entire deck fell off. Oh, lesson learned then, Titebond and plastic don’t mix.
For the next attempt I used Canopy glue which seemed to do the trick, the bond was good and even after a bit of prodding it refused to budge.
After construction was finished, I moved onto the covering, for this I’ve stuck to something familiar, which is basic Solarfilm. The wings were covered pretty quickly and focus turned to the fuselage, this is where the problems began. The first bit I tried was to tackle the turtle deck. The film went on easily enough, and as I left it in the shed I was quite pleased with the results. The problems came however the next morning when I popped into the shed to check on the results, to my horror literally hundreds of small bubbles had appeared all over the damn thing. I tried to remove these by turning up the iron and slowly working them out, at this point I managed to melt the turtle deck slightly such that it deformed. sigh!
I made a swift decision to give up with the vac formed component, and proceeded to remove it completely, using the removed deck (I managed to get it off in one piece) as a template I fashioned a new one from 1/64" ply. I soaked the ply and clamped it over the fuselage overnight to dry, the next day it held its shape well enough to be simply glued on with thin cyano. A bit of filler around the edges and its looking acceptable again. Below are a couple of pics, also showing the painted cockpit, waiting for a pilot.
-
Fournier build update
So after a few busy weeks (months?) at work and a couple of weekends away I’ve managed to push on with the Fournier. The principle construction is finished, after covering I’ve got to mount the servos and setup the control runs, but that is about it. A couple of pictures can be seen below. Onwards with the covering!


