Tech & Toys
-
Using a Raspberry Pi to control Maplin power sockets
For a while now I’ve been intrigued by the idea of home automation, but despite a large amount of research I’ve yet to take the plunge and buy anything. The one thing I do have is a bunch of these Maplin remote control sockets. These are simple things which just plug into any wall socket, then have a socket which you can plug any device into, a simple RF remote offers 8 buttons, on and off for each of the four sockets. The remote lets you choose from one of four channels meaning you can have four sets of four remotes all working within range of one another. I bought these originally because we had a few power sockets in awkward to reach places - who wants to move the sofa every time you want to turn a light on? - but never considered the possibility of using a computer to control them.
That was however, until I spotted a intriguing sounding tweet from Chris Swan directed at Andy Stanford-Clark:
** TWEET DELETED ** :(
Oh really Mr. Swan, now this does sound very interesting. I asked for some details and Chris pointed me at this blog post which explains pretty much everything I needed to know. The post linked to this library from Duncan McGregor which did the hard work and linked to the source of the transmitter I would need. Sorted then, this sounded simple enough!
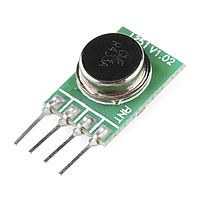
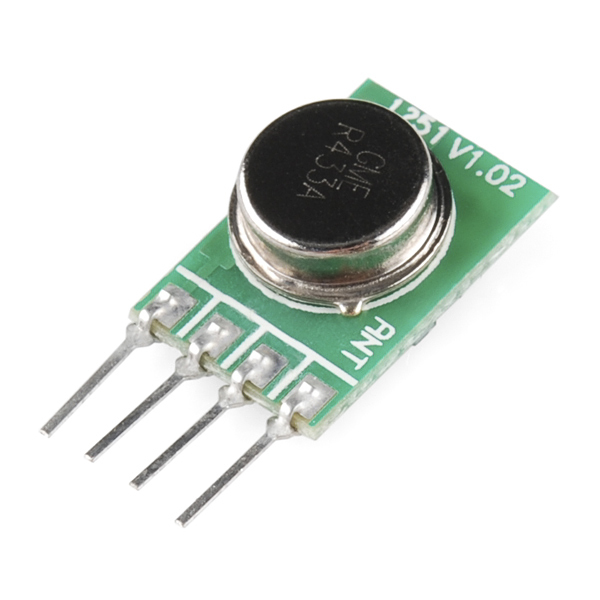
I bought one of the transmitters and a ribbon cable with a plug that fitted the GPIO connector of the Pi. I planned to snip all but three cables from the ribbon, shorten the remaining ones and solder these to the 3 pins on the TX, the hope was with a very short wire from the GPIO plug to the TX I’d be able to hide it inside my existing case. The pin out of the GPIO and the connections you need to make are listed on Duncan GitHub repo in the Readme. But in short it goes like this:
Tx Pin Raspberry Pi Header Pin Pin 1 GND Pin 6 0V (Ground) Pin 2 Data in Pin 11 GPIO 0 Pin 3 Vcc Pin 2 5.0 VDC Power Pin 4 ANT 173mm antenna wire (not on the Pi!) Once I’d soldered the connections, I plugged the ribbon cable onto the GPIO and booted the Pi. One quick clone of Duncans repo later and I ran the following:
sudo ./strogonanoff_sender.py --channel 1 --button 2 --gpio 0 onAnd hey presto my fish tank light turned on. minor celebration 🙂
I wanted to try and avoid sudo access, but reading a few, things, decided that sudo was probably safest! So be it.
I’m pretty terrible at remembering that the fish tank lights are channel 1, button 2 so I wrote a short python script which accepts room names and a simple on or off:
It essentially just uses a Python dictionary to store the room to channel and button mapping:
switches = {
'bookshelf': { 'channel' : 4, 'button' : 1 },
'tank':      { 'channel' : 4, 'button' : 2 },
'sofa':      { 'channel' : 4, 'button' : 3 },
'outside':   { 'channel' : 4, 'button' : 4 },
'spareroom': { 'channel' : 3, 'button' : 1 },
'all' :      True
}
I’ve put this script ‘switch.py’ into a repo in my Github account here. You run it like this:
./switch.py -s tank -a onThe success of all this lead me to consider actually building a remote control for these things that I could use on my phone, partly because it sounded like a neat thing to do and partly because finding the remote when the kids have been using it is non-trivial. The added, actually useful feature would be to turn lights off remotely when I go out and forget to turn them off.
So I pondered for a bit and sketched out a plan for a simple HTML UI running on a web server, somehow talking to the Pi to do the work. I didn’t want to expose the Pi to the internet because I already have a Linux box with a public IP and apache running on it and didn’t want two entry points into the house. I just needed a way of getting a command from a client browser, via the other linux box and onto the Pi. Then it dawned on me, I already use Mosquitto, the open source MQTT broker for moving temperature readings around, I could just use that. A bit more hacking lead me to write maplin-mqtt.py which is a variation of switch.py and simply subscribes to the MQTT broker and listens for messages containing commands.
I wrote it to expect JSON messages in the following format:
{ "channel": 3,"button": 2,"action": "off"}Testing this is as simple as using the command line MQTT publish client:
% mosquitto_pub -h trin -t foo/bar -m '{"action": "off", "switch": "spareroom"}'So now I just had to write a simple web UI which could publish messages of the correct format. I’ll write about that at another time because I hit upon something which changed my plans slightly 🙂
-
Fortigate Firewall Logstash Grok filter
I’ve been playing with Logstash recently, just this week I was asked to import a Fortigate firewall log. I did this by putting up a logstash syslog interface on a specific port, tagging the inbound traffic as type=fortigate and then using a simple RE and the kv{} filter to parse the log.
The gist can be seen here, or embedded below:
-
Saving Fitbit data
A while ago I bought myself a FitBit One to keep an eye on exactly how much I walk, it is a little expensive for a pedometer, but I liked the fact it syncs via Bluetooth 4 to a supplied dongle or to an iPhone. The data can be viewed on the dashboard on their site but also - and this is one of the things which attracted me to the FitBit - via an API. I’ve had it for a good while now and figured it was time to start looking into the API.
The first thing I wanted to do was get the historic data and save it somehow. I’ve got that bit working, I have a php script which is authenticated against my account and requests a given days data which is then saved as raw json to a text file.
I’ve no plans to do anything with this data yet, so json in a text file suits me fine. I can read it with pretty much anything and it is easy to backup.
I’ve put the initial simple code up on GitHub which you can see here.
